Future Pinball Link
With the addition of some code Future Pinball (FP) can be set to message DOFLinx directly. This allows FP tables to be DOF'ed.
Assumptions
- DOFLinx is installed and working
- Future Pinball is installed and working
How does this work?
DOFLinx detects the FP process, then it waits for the FP table to initialise. If the FP table has DOFLinx code setup within it then a flag is set in memory that DOFLinx reads. DOFLinx then sets its own flag for FP that details the capability, ie shaker, gear, knocker. FP then sends messages by setting memory values to DOFLinx. DOFLinx continuously monitors for these messages while the FP process remains active and processes them as appropriate.
DOFLinx has parameters to identify the various solenoids, contactors and toys. FP messages DOFLinx by function, not device / port. In other words, FP would send a message like Left Flipper on for some time. Its then up to DOFLinx to interpret and process that message. As such DOFLinx must know what port, etc to use for each device.
Multiple versions of FP have been tested. Any version should work. No changes have been made to FP to allow this to work.
In a slightly more technical sense, when enabled via the FP_ATTEMPT_LINK=1 and with FP listed in the PROCESSES= parameter, ie "PROCESSES=Pinball FX2,Future Pinball" DOFLinx will look for a link to FP when the FP process starts. If FP_ATEMPT_LINK=0 then DOFLinx will operate as normal and listen to the keyboard keystrokes.
If the link is set to run within DOFLinx but not set up within the FP table you are starting, then the link attempt will time out and DOFLinx will handle Future Pinball as per its other configuration. To get a link to FP, the FP table must have the DOFLinx code inserted into it and activated. Examples of how to do this are below.
How do I set up for this?
To set yourself up do the following:
- Ensure you have "Future Pinball" as one of your processes, ie "PROCESSES=Pinball FX2,Future Pinball" in your DOFLinx.INI file.
- Add the parameter FP_ATTEMPT_LINK=1 to your DOFLinx.INI file
- Setup all of your LINK_xx= parameters where xx=LF,RF,LS,RS,ML,MC,MR,BL,BC,BR,SH,GR,KN,ST,EB,CN,EX,LB,FN.SR,BK
- Add DOFLinx.vbs to your FP scripts folder. If your folder structure was C:\FP\Tables then this folder would be C:\FP\Scripts.
- Run your DOF'ed FP table. Below is a sample section of the DOFLinx.INI file to configure the various devices. This is my setup, so be sure to edit it for your device / port numbers, best default times for devices and desired maximum on times.
FP_ATTEMPT_LINK=1
LINK_LF=117,50,10000
LINK_RF=125,50,10000
LINK_LS=118,50,500
LINK_RS=126,50,500
LINK_ML=127,50,500
LINK_MC=128,50,500
LINK_MR=129,50,500
LINK_BL=130,50,500
LINK_BC=131,50,500
LINK_BR=132,50,500
LINK_SH=115,1000,5000
LINK_GR=116,750,10000
LINK_KN=124,120,500
LINK_ST=102
LINK_EB=101
LINK_CN=106,105,103
LINK_EX=104
If I want to DOF a table, how do I do it?
The FP code for DOF'ing a FP table is designed to be added in and left in regardless of DOFLinx being used. Ideally table authors will add this code to their tables in the same way it has been done for VP tables.
The mechanics of the process are:
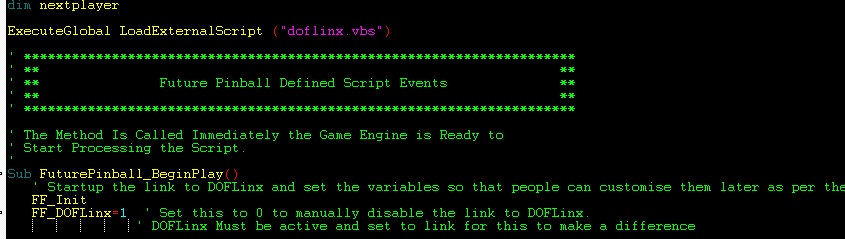
- Directly below your "Dim" statements add the line "ExecuteGlobal LoadExternalScript ("DOFLinx.vbs")
- As the first items in the standard FuturePinBall_BeginPlay() section add the lines "FF_Init" and "FF_DOFLinx=1"
- Now do your coding.
The image below shows the above steps implemented.
At its simplest replace "PlaySound xx" statements for flippers, slingshots, drop targets, bumpers and jets with "FF_Sound LF,-1,xx". The format is "FF_Sound DD,HHHH,SSSSS" , SSSSS is the original sound. The original sound is played when the DOFLinx link is not active. DD is the device signified by the device code (constant in the DOFLinx.vbs file). HHHH is the time to turn the device on for in hundredths of seconds, the special value of -1 will use the default on time setup by the user in the DOFLinx.INI file.

The image above shows the line that was, and the new line that replaces it. The left flipper is turned on for 10 seconds in this command. This will keep the left flipper on for a reasonable time or until the key is released and another "FF" command turns it off. If the user has set their maximum on time for this device to less than 10 seconds to protect their solenoids, then the left flipper solenoid will release sooner. It would be quite reasonable to set to time to 999999 upon flipper press.

In the key released section, you then turn off the left flipper off. For a simple flipper "bang" you could use time "-1" when turning the flipper on, and not turn the left flipper back off. This would use the users default on time for this device. Best practice is to turn it on then back off.
More complex programming can be performed using a few more supplied procedures and functions:
Functions
FF_Active -- Boolean
Used to test if the link from FP to DOFLinx is active. True when the link is active, false when it is not.
FF_ISDevice(DD) -- Boolean
Allows you to test if a specific device is configured for the cabinet this table is being played on. The function will return true if the device is configured.
Generally testing for a device is not required. If a message is sent for a device that does not exist, then the message will simply be ignored. Testing for devices is used by the supplied procedures FF_SOUND and FF_SOUNDVOL to determine if the device exists when determining if the original sound should be played or not.
So, for example, there is no need to test if the Coin button exists before setting it to flash. Just set it, and if it exists, it will flash, if not, nothing will happen.
Valid devices to test are:
DV_LF = Left flipper
DV_RF = Right flipper
DV_LS = Left slingshot
DV_RS= Right slingshot
DV_ML = Mid field left solenoid
DV_MC = Mid field centre solenoid
DV_MR = Mid field right solenoid
DV_BL = Back left solenoid
DV_BC = Back centre solenoid
DV_BR = Back right solenoid
DV_SH = Shaker motor
DV_GR = Gear motor
DV_KN = Knocker
DV_FN = Fan
DV_SR = Strobe
DV_BK = Beacon
DV_BE = Bell
DV_C1 = Chime 1 (high)
DV_C2 = Chime 2
DV_C3 = Chime 3 (low)
DV_RGB = RGB lighting
DV_FLOL = Flasher, outside left
DV_FLIL = Flasher, inside left
DV_FLCN = Flasher, centre
DV_FLOR = Flasher outside right
DV_FLIR = Flasher, inside right
BUT_ST = Start button
BUT_EB = Extra Ball button
BUT_EX = Exit button
BUT_CN = Coin button
BUT_LB = Launch ball button
BUT_FR = Fire button
BUT_P1 = Player 1
BUT_P2 = Player 2
BUT_PS = Pause
Procedures
FF_Button DD,AA,IIIII,HHHHH
-
DD -- Button device to activate
-
AA - The action to perform
BA_ON =Turn the button LED on
BA_OFF = Turn the button LED off
BA_TT = Turn on the button LED for the supplied hundredths of a second
BA_FL = Flash the button LED for the number of iterations with the supplied time being the   duration between iterations
BA_FD = Fade the button LED up and down for the number of iterations with the supplied time   being the duration to fade up / down
- IIIII -- The number of iterations to perform the action. For flash and fade cycles on is one iteration and off is another. So, if you want the button to flash on then off its 2 iterations. This way you can flash or fade a button LED leaving it on or off when the cycle is finished.
- HHHHH -- Hundredths of seconds per iteration
FF_Colour CCCCC,AA,HHHHHH
- CCCCCC -- a valid DOF colour name, ie Red, Light_cyan. "Random" is a valid colour name and will simply display a random colour from the currently active colour palette.
- AA -- the action to perform
- RGB_DF = Start the default RGB colour cycle as set by the user in DOFLinx. This will give automatic colour changes based on a fixed user set colour, flipper initiated changes, or timed changes using either the full colour palette or a restricted palette, as per standard DOFLinx parameter and GAME_COLOUR settings. The colour name supplied (CCCCC) is irrelevant for this action. Once started for a game the default colour run cannot be stopped. It is an easy way to add colour with one command for the entire table.
- RGB_TT = Change the RGB's to the supplied colour for the supplied time then revert to the colour displayed before the command.
- RGB_CH = Change the colour to the new colour and leave it on until over written by further commands.
- HHHHHH -- hundredths of seconds to turn on the colour for. Maximum is 999999 or 9999 seconds.
FF_Dev DD,HHHHHH -- Activate a device for the specified time
Turn on the device code for the specified time. The special time of minus one (-1) will use the default run time set by the user in their DOFLinx.INI parameters. An on time of zero (0) will turn the device off from a previous on command if the time period has not yet elapsed.
This command is used when there is no sound required when the DOF link is not operational. It is the same as FF_Sound DD,HHHHHH, " "
FF_DOF T,EEE,HHHHHH
This command triggers Direct Output Framework events as defined in the various DirectOutputxx.ini files. It is initially designed to trigger addressable LED commands, but there is no reason that any other "E" type command can't be triggered.
- T=Type, normally "E"\
- EEE = The event trigger number\
- HHHHHH = The duration to leave the trigger on in hundredths of seconds. Two special values exist, zero (0) will turn the trigger off, and minus one (-1) will turn the event on with no off time, normally for cases where the event has its own timer within DOF.
FF_DOF "E",123,100 will turn on DOF event E123 for 1 second Note you must have first opened a ROM via the FF_ROM command to use any FF_DOF commands.
FF_Flasher DD,AA,IIII,HHHHH,PPP,CCCCC
-
DD- The device to activate.
-
AA - The action to perform
FL_ON =Turn the flasher on
FL_OFF = Turn the flasher off
FL_TT = Turn on the flasher for the supplied hundredths of a second
FL_FL = Flash the flasher for the number of iterations with the supplied time being the   duration between iterations
FL_FD = Fade the flasher up and down for the number of iterations with the supplied time   being the duration to fade up / down
- IIIII -- The number of iterations to perform the action. For flash and fade cycles on is one iteration and off is another. So if you want the flasher to flash on then off its 2 iterations. This way you can flash or fade a flasher leaving it on when the cycle is finished.
- HHHHH -- Hundredths of seconds per iteration
PPP-- The maximum percentage intensity 0 -- 100. Ie, if set to 50 and fade (FL_FD) the flasher will fade up to 50% of the supplied colour and back to nothing.- CCCCC -- The colour to use during the action. "Random" is a valid colour name and will simply display a random colour from the currently active colour palette.
FF_Init -- initialise the force feedback (FF) link from the FP side.
This command must be executed as early as possible in table start up to enable the link to function correctly.
FF_PROC CCCCCC,AAAA
Used to run an external command, CCCCC, with argument, AAAA. Not used by core DOFLinx but available for use if you want to have a table trigger some sort of special external event via program or batch file.
FF_PUPlayer CCCCC,SSSSSS,AAA
Used to run PUPlayer from FP. There are two CCCCC commands, PUP_INIT (1) and PUP_EVENT (2). You must issue a valid PUP_INIT in a table before you can issue PUP_EVENT commands. The PUP_INIT command should be placed in your timer to test once the DOFLinx link is established.
The SSSSSS string will be the ROM name for a PUP_INIT command and the Event code for a PUP_EVENT. Argument AAA is zero for PUP_INIT, and must be a valid argument for a PUP_EVENT from 0 -- 255.
Sample commands are:
FF_ROM RRRRRR
If you plan to use FF_DOF commands to trigger DOF events, ie addressable LEDs, then you must start a ROM in the Direct Output Framework (DOF) first. Normally the ROM started is not a real ROM like in VP, but a fake ROM setup in the DOF Directoutput30.ini file to support things like addressable LED commands.
The command is used as early in the FP scripts, but after FF_Init, and after the link is established. The best place is in the DOFLinx timer once the link is detected by the FP script as being in place. Sample syntax is;
FF_ROM "fp_motu"
See FF_DOF for details on how to send DOF commands from FP scripts.
FF_Sound DD,HHHHHH,SSSSS (replaces PlaySound SSSSS)
FF_SoundVol DD,HHHHHH,SSSSS,VV (replaces PlaySound SSSSS,VV)
- SSSSS -- the sound to play when the FP to DOFLinx link is not active.
- VV -- The volume modifier for the standard PlaySound command
-
DD -- the device to activate.
DV_LF = Left flipper
DV_RF = Right flipper
DV_LS = Left slingshot
DV_RS= Right slingshot
DV_ML = Mid field left solenoid
DV_MC = Mid field centre solenoid
DV_MR = Mid field right solenoid
DV_BL = Back left solenoid
DV_BC = Back centre solenoid
DV_BR = Back right solenoid
DV_SH = Shaker motor
DV_GR = Gear motor
DV_KN = Knocker
DV_FN = Fan
DV_SR = Strobe
DV_BK = Beacon
Note
SH,GR and KN will play the supplied sound unless DOFLinx indicates the required devices are present. With an active link presence is determined by DOFLinx having been supplied valid devices LINK_SH, LINK_GR and LINK_KN via the DOFLinx.INI configuration file.*
- HHHHHH -- hundredths of seconds to turn on the device for. Maximum is 999999 or 9999 seconds.
Automatic sounds set on the object should not be used in this design. Doing so will cause the sound to play regardless of force feedback being active or not. For objects with sounds set you will need to remove the default sound and add the FF_Sound line, ie there is no PlaySound line to replace.
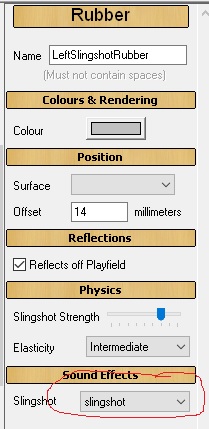
In this example the sound effect was "slingshot", it should be set it to "none" and then add the line below in the "_hit" code.

Actions can be added to other events on the table. For example, when the user tilts the following will run the shaker motor and flash the RGB devices red. The PlaySound "Tilt" was the original action. The new actions simply add to that.

An example of complementing a playfield flasher with the RGB flashing the same colour for the same time is given below. Note the FF_Colour is measured in hundredths of seconds (value of 100 below) whereas the FlashForMs is in milliseconds (value of 1000 below).

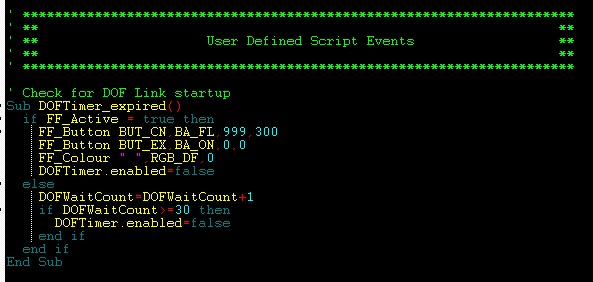
If you want to set some force feedback items when a table starts (ie start colours, set button LEDs) you will need to set up a timer. The reason is that any force feedback control code, other than initialisation stuff, placed in the FuturePinBall_BeginPlay() section is likely to execute before the link has been properly established. Force feedback control code executed before the link is properly established will be effectively be ignored.
Doing this is simple, add a timer like this to the side of the playfield.
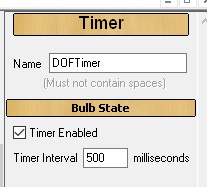
Then add some code like that that below. With the timer set to 500ms the table will test for an active link up to 30 times at ½ second intervals, meaning it will test for 15 seconds after the table starts. The link is normally up within 1 second, so a 15 second wait will be fine. Once a link is detected some actions can be performed and the timer is disabled for the rest of the game.
The lines to customise in the sample below are:
Of course you can add more lines of code for initialisation. Be careful to not remove the DOFTimer.enabled=false statement as you want the timer to stop once it has been executed once.